Thursday, February 28, 2013

Vogue 9868

I had not been planning on making my 1940 nightgown so soon, but the other day I was at Hancock fabrics looking for some lace and I found the prettiest softest fabric that I knew just had to be a nightgown! Wednesday morning I was still thinking about the fabric so I ran back over and picked some up!
My unfortunately torn pattern

When I was really little I had one of those My Twinn dolls and we had matching nightgowns. It was my absolutely favorite nightgown and I wore it till I physically couldn't fit in it anymore! They don't sell it anymore, but it looked like this -
I think it's where my idea of nightgowns must have little rose buds on them to make them perfect! So when I found this fabric I just couldn't say no. It's not the same texture but the roses are almost identical!  

The pattern only had 4 pieces to it, so it was super easy and fast to put together! I love the length and that it doesn't use up a ton of fabric, though it is on the bias. Cutting on the bias always makes me anxious because it leaves a bunch of scraps I can't use but it was definitely worth it for this!

I was also excited because it gave me a chance to use my new serger I got for christmas! It took a little bit to get the tension right and everything, but it makes it look so much nicer inside! 


I don't know the name for this type of trim- the cotton lace with ribbon that's run through it- but I just love it! It was on sale too, so now I have extra for something else!  I like that the ribbon could be changed out too, I may put a pink one through it to contrast the white. 

All in all, I'm very happy with how this turned out. I LOVE this fabric and love the pattern! I'm thinking I need to trace the pattern so I can have a sturdy version and am able to remake this again if I want too. Though, I can't picture it in any other fabric, did I say how much I really loved this fabric?! It was a quick sew, it took me just a night and that's with all my fiddling with the serger to get that to work right. With this nightgown pattern and Advance 4522 I'm set!


Wednesday, February 27, 2013

Simplicity 8107

A while back I used Simplicity 8107 to make a dress for a christmas party. It was a dress up type party so I was trying to be a 'christmas tree', hence the green corduroy and gold trim.
I actually really liked this pattern a lot! I changed the neckline to a V because the rounded one looked odd on me, but that was simple to do! I also really liked that this was fully lined. I would definitely make this dress again, even in corduroy, though a different color I think. 

The few pictures I managed to take were just horrible but I found one that shows only some of the dress but does at least show the headband I made. My friend, who was a reindeer, mostly blocked the view of the dress but you can see the gold belt I put with it. Unfortunately I managed to have the cheesiest smile in the only good picture of the dress *sigh* 
The headband I made from just a plain gold headband and then I found a star and some gold sparkly twisty things that I used to hold the star on and twist around the headband. That was all I did for that. 


In other news: The Pink Rose 1860 dress is done! or just about... some last minute hand sewing adjustments and the hem and then it will be. Here's a sneak peak of that -


Sunday, February 24, 2013

1860 Part 2

I didn't get as much time as I would have liked this weekend to work on the pink dress but I did get a good amount done! As of Sunday night...

I finished the darted lining and started building the top fabric onto the lining and finished with an almost done bodice! Almost... there's still quite a lot to do. 

I did find an old collar I embroidered a while back for a different 1860 dress, it didn't fit though and has been sitting in my stash serving no purpose until now! The embroidery pattern is actually from a Godey's Ladies Book, though I can't remember what year. 


I made some piping for the armscyes with leftover yarn I used for my corded petticoat. 

And... I started my sleeves! I decided to go with puff sleeves. I have one just about done and one half done. I decided these were best since I look young enough to still get away with short sleeves and I really did like them. Starting the sleeves I actually had no idea where to even begin but thankfully I found this tutorial on one of the blogs I love to read, Romantic History! It helped so much! 
As of right now I think I'll have some leftover fabric so I may try to make some long sleeves that I can easily baste on and then take off when I just want short sleeves.  Somewhat like this... 
source
I have the skirt sewn together but I want to cartridge pleat it and still have to make the waist band and buttons. Lots of hand sewing so while I'm hoping I will be able to be done by Tuesday... most likely it will be a little longer!


Saturday, February 23, 2013

1860 Dress

Part 1:

So far this is what I knew I wanted on my dress-
- Gathered bodice with a yoke
- short sleeves (possibly with long sleeves that are removable)

I got about 5 or 6 yards of this beautiful pink cotton fabric! I hope it's accurate, I know they had floral prints, but I just loved the fabric too much too pass it up!
Source
I've also discovered another inspiration picture
Source
Mostly I really like how the waistband is on this one. If you look closely the bodice opens directly in the front, but the waistband extends past and the skirt opens more on the side.  Though I'm liking the sleeves with the small ruffle a lot too.

First I had to draft a pattern for this dress. It's something I really should do more often and get better at but I always put off drafting any patterns mostly because I'm scared to mess it up! 
I started with the bodice from Simplicity 7212 and I made a copy of the front bodice. The back I left the same. I cut the bodice where I wanted the yoke to end and then just made a somewhat rectangular lower bodice that extended past the top piece so there would be fabric to gather.


I made a mock-up of it and it had some issues being a bit big and just didn't look as great as I wanted it too. At this point I considered just making the darted bodice from the pattern and I cut out a piece in spare fabric and sewed up the darts to see how that looked. Then I remembered reading about how gathered bodices typically had a darted lining inside. So I placed my mock-up pieces on top of the darted bodice to help me figure out how much to cut off of the lower bodice and basically just fit the gathered bodice to the darted lining and it worked! 

So now I feel confident cutting out the front bodice tomorrow and getting that together.


I did put the back lining and top together tonight though I have to admit I didn't iron it!  The color is actually a dustier pink then the picture shows. I'll have to get a better picture showing the fabric color next time!

Looking at this I'm not sure how accurate it is to do the gathered front with this particular bodice back... I can't think of seeing one like that but I'm not going to change it now, I really need this to be done to wear on Tuesday!


Friday, February 22, 2013

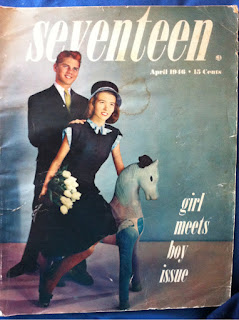
Seventeen 1946

A couple years ago, I found an old Seventeen magazine and ever since then when one comes up on eBay or somewhere else and it's not too expensive I snatch it up!  I love looking at them, they offer such a great insight into young fashions of the 40's and 50's and just about the teenage culture of the time. I thought I'd slowly start sharing photos of them on here, since you really can't find out much information about early seventeen magazines anywhere online except for their cover photos. It's too bad Seventeen doesn't post an archive of their old magazines from the 40's and 50's and even the 60's.

This is my newest Seventeen magazine, from April 1946! It's one of the earlier ones!


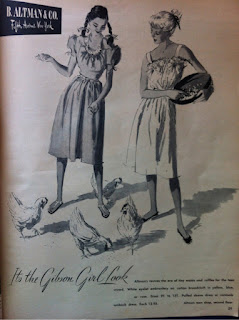
The Sleeves on this one!!!! So pretty!
I love the low cut back on this! 

Can Homemaking Really Be a Career?
This is one of my favorite things in this issue! Below it says "Homemaking is not just doing a series of dull things to make a living. It is living... filled with variety, exciting and challenging" by Margaret Mead
You'd never in your life see an article like this in the modern Seventeen magazine put out today! 

How Not To Get Another Prom Bid
And finally a funny article about what "not" to do on a prom date! From across top row to bottom row says:
- Display your talents long and loud, it makes your date ashamed and cowed
- Too many frills, small bows and lace will make Tom turn away his face
- Big books and words denote a brain all beaux will fear to date again
-A lipsticked shirt makes Jackie blush- The culprit will not get a rush
- Go in for gossip; smirk and chat, for no one likes a vicious cat!
- Eye all the stags; ignore your date (When he deserts you, call it Fate)
-If you would stay at home alone- Antagonize the chaperone!
- Wave both your arms and shout whoopee, then watch the startled stagline flee!


On a side note: I finally got around to updating the look of the blog a little! I made a new banner that actually fits! 

Thursday, February 21, 2013

Kedettes

I found this ad for shoes in a 1950 Seventeen magazine I got a while back and I was obsessed with them and have been searching for the at least a shoe similar so that I could put holes in and shoelaces. I love that they can be tied in so many ways.  

I saw this picture of another Kedette ad on Casey's Elegant Musings  It's the same shoe as above and I just love the pink color! 


They make think of Toms shoes actually. It wouldn't be hard to add the grommets (is that the right word?)  and lacing. In fact, they already have a shoe that has the grommets in it (except for at the front), the lacing would just have to be changed! 


Tuesday, February 19, 2013

Starting the 18th century

It's been one of my goals for a while to work on sewing for the 18th century since I live in Texas the only opportunities I've had are mostly for 1840-1860 reenacting.  I finally decided to go ahead and just do it.
I'm starting from the inside to out, so with the shift first.

I've found some great websites for just starting out  here's one, and  this one here! I used both of them to create my pattern. I've also been handsewing all of it, I want it to be as authentic as possible!
So far I've got one sleeve and almost the side done. It's not that its so very time consuming, but I really only get a bit of time on the weekends or when I happen to be watching a show on tv to work on it. Taking 18 hours of school and a teaching job has been taking all my time!

Along with that, I actually have started back up working on a dress I'm making from a homemade pattern that I think is somewhere in the 1910's or 1920's. I got stuck on how to make the closing for it but I've been studying some examples from the 20's. 
I used a fagoting stitch by hand on the bottom of one of the skirt pieces. The pattern I got at a garage sale and it was with another homemade pattern for an envelope chemise, my plan is to make the chemise in a blue that will show through the white of this dress. Hopefully when it's completed if I put it together right it will be easier to date the pattern. 

Both are slow in coming since I'm sewing them by hand, but progress is being made! 

Tomorrow I start up my volunteering again at the local historical village by me and while I can just squeeze into the dresses I've had forever, I desperately need a new one and new 1860 underthings. Mine are ripping apart! So that will need to be squeezed in and soon! 

P.S.  I haven't left my vintage patterns behind! I've been ordering quite a lot while I've been idle and I'm anxious to start sewing those too!