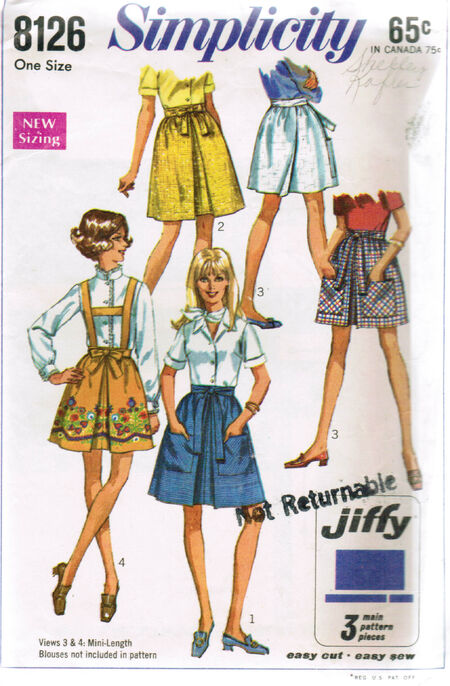
I sewed up Simplicity 8126 yesterday! I used an old cotton fabric that I had from an 1860 skirt I made four or five years ago but is too short now. I've really wanted a great wrap around skirt so I was excited for this one!
I left the pleat out because I didn't think a large pleat on my stomach would be too flattering and instead just gathered the whole thing. When attaching it to the waistband the gathers had to be really spread out almost to the point of no gathers and I thought it was weird but I just kept going. I finished it up then left it to try on today.
I tried it on today and the first thing I notice is, it barely fits around and gaps in the back if I'm not standing straight and still. At first I thought it was because I didn't put the pleat in and then slowly I realized it was because I only cut out one panel for the skirt... I should have stopped when I was sitting there unpicking my third mistake last night! I should never ever sew tired!
So today after picking apart the whole thing, I finally had my skirt! It ended up looking better on my mannequin then on me. Not that it's awful, but just a little too full of a skirt with the pleat in it also (which I ended up putting it back in, while remaking it just to be safe). I also added a button hole in the waistband to pull one of the ties through. The instructions had them just crisscrossing in the back and I liked this way better.
I like it but it's not my favorite. I would maybe make it again but I think I'd rather have a less full wrap skirt. Plus, I still don't love that pleat in the front!
Thursday, May 30, 2013
Wednesday, May 29, 2013
L.M Sewing
L.M Sewing!
I've recently been thinking about changing the name of this blog mostly because I do more sewing than just vintage clothing. I didn't think 'Vintage Bisou' encompassed the historical sewing, the home sewing, and the modern sewing I also put on this blog. So I've changed the name to L.M. Sewing. The link is also changed: lmsewing.blogspot.com.
L.M. is for my great-great-grandmother Lillian May whose name I always wish I had instead of Danielle!
L.M. is for my great-great-grandmother Lillian May whose name I always wish I had instead of Danielle!
I've got a somewhat new banner, I left the vintage girl on it though because I loved that part! On a side note, I hate making blog banners! It takes me forever to get the measurements right!
And coming up very soon (as soon as I find the right fabric for it!) I plan to sew this cute 1970 skirt up!
 |
| Via |
Bow Pillow Tutorial
A while back I found a picture of the pillows that the Kate Spade store in New York has in their shop (Maybe they are in all of their shops?) I love looking at the style of Kate Spade since she always has such pretty basic styles and usually with a vintage feel.
Anyways, I loved these pillows they have and decided I needed to make one. My friend just moved into her new dorm at school today so I decided I'd take the opportunity to make one of these pillows as a 'housewarming' gift for her. As a bonus, I got to use up some more of my fabric stash! I still haven't bought any new fabric this summer, yay!
Mine aren't quite as tall and the middle band is larger width wise, but this could easily be fixed. I was able to make more bow pillows if I made mine shorter though!
 |
| via |
Anyways, I loved these pillows they have and decided I needed to make one. My friend just moved into her new dorm at school today so I decided I'd take the opportunity to make one of these pillows as a 'housewarming' gift for her. As a bonus, I got to use up some more of my fabric stash! I still haven't bought any new fabric this summer, yay!
Mine aren't quite as tall and the middle band is larger width wise, but this could easily be fixed. I was able to make more bow pillows if I made mine shorter though!
Bow Pillow Tutorial
1. Cut a rectangle that is 20 inches long and 12 inches tall. This could easily be changed for smaller or bigger pillows. For one more similar to the Kate Spade pillow in the picture make it taller and shorter width wise.
2. Mark the very center and draw a line. From the center line draw two more lines on either side 2 inches from the center line. This will be the width of the center tie so again this could vary if you want a smaller center wrap or a larger one.
3. Then you will sew up your rectangle making sure to leave a space open across on side of the center line. This will allow you turn it right side out of course, but also the sewn closing will be covered by the bow tie wrap. Turn right side out, press and stuff with stuffing. Then sew up the opening.
4. To make the bow tie wrap you will want it to be the size you marked off from your center line. In this example the total area marked was four inches. I added an inch for seam allowance and just a little extra side room. Make it longer than you think you will need and in the next step we will measure it. Sew up the sides, turn and press.
5. Now you should have a long tube like piece and a stuffed rectangular pillow.
6. Take the bow tie wrap and wrap it around your pillow. Mark with pen where to sew the two sides of the tie together. You want it to be somewhat tight so that it squishes the pillow in the middle, making the bow shape. Press open and then slide over side of pillow till it's placed in the middle and your done!
Tuesday, May 28, 2013
Embroidery Inspiration
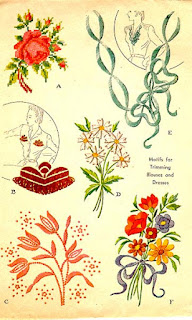
It's a new week of sewing and I've been checking out all the vintage patterns on The Commercial Pattern Archive. Their free pattern search comes up with tons and tons of patterns! Here's some of the embroidery I've been inspired by!
The Bow embroidery as shown on a blouse in the top right would be so cute to put onto a button up shirt!
How pretty would the bottom border design be with some beading incorporated into it?
This pattern only shows these three letters, but since my name begins with D, I'd love to use that D on something! I'm always looking for embroidery alphabets to keep on file for when I want to embroider something. This would be a good D for a pillow I think.
 |
| via |
| Via |
| Via |
There's so many more patterns, it's a great website! It only shows the cover photo and the back photo but some of the more basic patterns may be easily scaled up, I'll have to try it!
Friday, May 24, 2013
Basics
 |
| Via |
I'm still trying to use up fabric I have so for the first I used some kind of blue and white floral cotton blend that I found cheaply at an antique store and the second I used a floral rayon fabric I bought a couple years ago and had leftover from another outfit I made. It has a cute little pocket but it's hard to see on both of my fabrics!
I like that this pattern is a great basic and can also be easily modified. I will definitely be making more of these! I found this tutorial for a tank top with a split back and want to try this next! It's a different tank top pattern but similar enough that this should be easy to do with my pattern!
Thursday, May 23, 2013
Placemats!
So as part of cleaning up my stash of fabrics I had, I've been trying to use fabric in small quick projects. A while back I found some chicken fabric at Hancocks and because my mom has a somewhat chicken theme in her kitchen I made her some placemats and napkins.
I still had a good amount of fabric left over though and I can't imagine what I would do with chicken fabric so I decided to make some more placemats and potholders/ hot pads. The placemats I made before were just basic squares with some rick rack on them and this time I wanted something a little sturdier so I quilted them and bound them with bias binding made from the chicken fabric.
The hotpad was just a small quilted square and I made this first so didn't think to bind it with it's same fabric and also just wanted to use up some binding I had. I keep telling myself that somehow the blue goes with the red...
It's probably really not the best hot pad since I didn't use any thermal batting or anything like that that most tutorials call for in their hotpads and other kitchen things. I just used some batting I bought for a quilt I made that I don't like and am trying to use up. So we'll see how it goes, they may catch on fire and go up in flames but hopefully they will work well enough to use just to set hot things on.
Of course, then I found the leftover red binding. I wanted to use it up so I grabbed another scrap of fabric and made two more for my own stash of things for my house I'm moving into this July!
Wednesday, May 22, 2013
Summer Sewing
For mother's day I embroidered a "Mothers Tree" which was basically just my mother's mother and her grandmothers and their grandmothers etc., as far back as I could. So I guess it's kind of confusing if someone else looked at it since it includes both grandmothers, since that means mother-in-laws are on it.
Originally I was going to just frame it but decided to make it into a little pillow filled with lavender. I really like how it came out though, I used a scrap of silk I had and the lavender was perfect for it!
Subscribe to:
Comments (Atom)


